My Gingerbread House

12.13.2018

gingerbread, gingerbread house decorating, christmas gingerbread house, gingerbread recipe, christmas house, gingerbread house recipe,
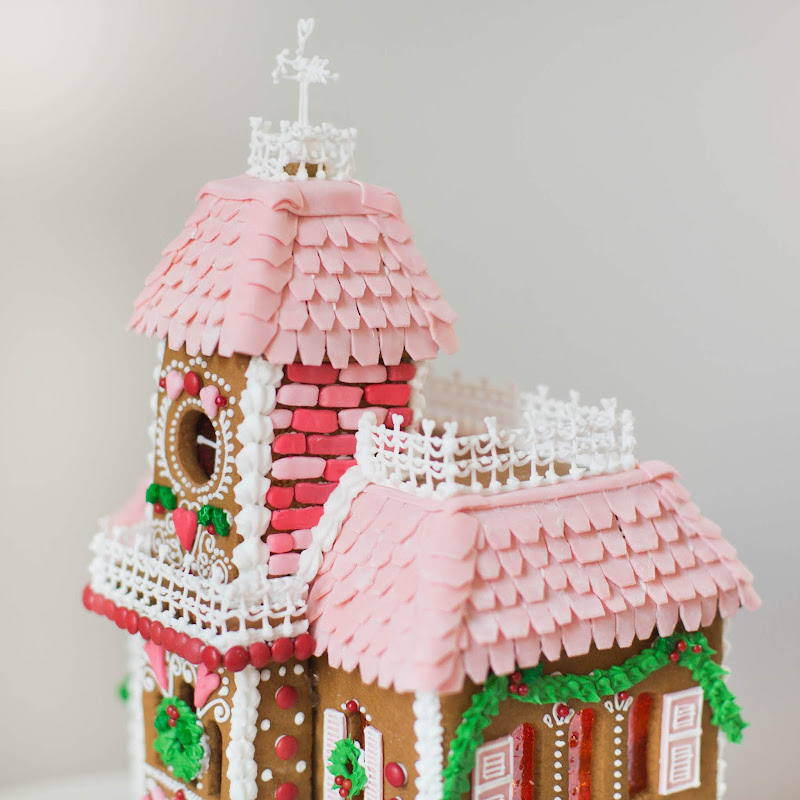
Ever since I can remember building and decorating gingerbread houses has been my favorite Christmas tradition.  It started with building graham crackers into a home, then it went to buying gingerbread kits and this year I decided to bake my own gingerbread and build exactly what I imagined, and although this may seem daunting, I have to say this was SO fun! So fun, that I prolonged the process of decorating just so that it wouldn't end.  It was my relaxing time after the kids went to sleep and was the perfect therapy for me after long days.  I'll post the recipe I used and what candy was used for each design. 
gingerbread house, gingerbread, gingerbread house decorating, christmas gingerbread house, gingerbread recipe, christmas house, gingerbread house recipe,
gingerbread, gingerbread house decorating, christmas gingerbread house, gingerbread recipe, christmas house, gingerbread house recipe,

gingerbread, gingerbread house decorating, christmas gingerbread house, gingerbread recipe, christmas house, gingerbread house recipe,

gingerbread, gingerbread house decorating, christmas gingerbread house, gingerbread recipe, christmas house, gingerbread house recipe,

Since this was my first time baking and constructing a house I found a pdf pattern of a haunted mansion that I liked and based my design off of that.  I changed up the windows and some of the design once I printed it out, but it was super helpful to have something to go by for my first house.  

What I learned about baking gingerbread for the house was that you don't want to add any baking soda or powder because that makes it rise and softer, so don't add that in. 
I used the gingerbread recipe from Christine Mconnell

GINGERBREAD HOUSE RECIPE

1 1/2 cups unsalted butter, softened
1 1/2 cups brown sugar, packed
1 normal jar of molasses
2 tsp. salt
4 tsp. cinnamon
4 tsp. ground ginger
1/2 tsp allspice/clove
2 large eggs
7 cups all purpose flour

DIRECTIONS:
To make this easier, cut out your planned structure on paper and use that as a pattern to cut your gingerbread house to ensure a solid structure. 

1. In a mixer, beat the butter & sugar until creamy, add the molasses and eggs. In another bowl, mix all dry ingredients.  Once done, slowly mix into the wet ingredients and stir until it's clean from the sides. Wrap the dough in plastic wrap and store in the fridge to chill. 

2. Heat the oven to 360 degrees F.

3. Dust parchment paper with flour and start rolling out the dough directly onto the parchment paper. Cut out the shapes using the homemade stencils and save the scraps of dough for the next sheet.

4. The baking time varies depending on how large your cookie is. Honestly just keep an eye on your first batch and you can figure out what works best for your next batch. Take them out when it's golden brown. 

5. When removing the gingerbread from the oven cover it with a sheet of parchment paper and place another cookie sheet on top to keep it from puffing up and to make it flat, allow it to cool completely before handling. 

ROYAL ICING RECIPE

2 egg whites
4-5 cups of powdered sugar
half a lemon juiced *
2 tsp. light Karo syrup

DIRECTIONS:
1. Separate the egg yolk from the egg whites and put in bowl, start beating until light and fluffy. 

2. Add in the rest of the ingredients and beat for 10 min or until smooth and shiny.  

*So this recipe isn't exact because depending on if you want a stiff icing for detailed decorating you'll need less lemon juice and more powdered sugar or if you want to flood the cookie like I did for my board you'll want to add more lemon juice. *

WINDOWS

I used jolly ranchers for the windows. I unwrapped them, put them in a bag and smashed them, then set them on parchment paper and estimated the size for each window. Put it in a preheated oven at 350F and kept an eye on it until it was ready. If you leave it in longer you get more bubbles in the candy, I thought I initially ruined mine but once it cooled down I broke them into the sizes for the windows and it was perfect. I added it to the house by using my stiff royal icing and lining the inside of the window to hold the jolly rancher like glue. 


gingerbread, gingerbread house decorating, christmas gingerbread house, gingerbread recipe, christmas house, gingerbread house recipe,

CANDY LIST!

Roof- Bubble gum tape
Hearts- Starbursts
Wreaths- green royal icing piped with a tip
Red berry bushes- gummy candy
Windows- Jolly Ranchers
Bricks- Starbursts
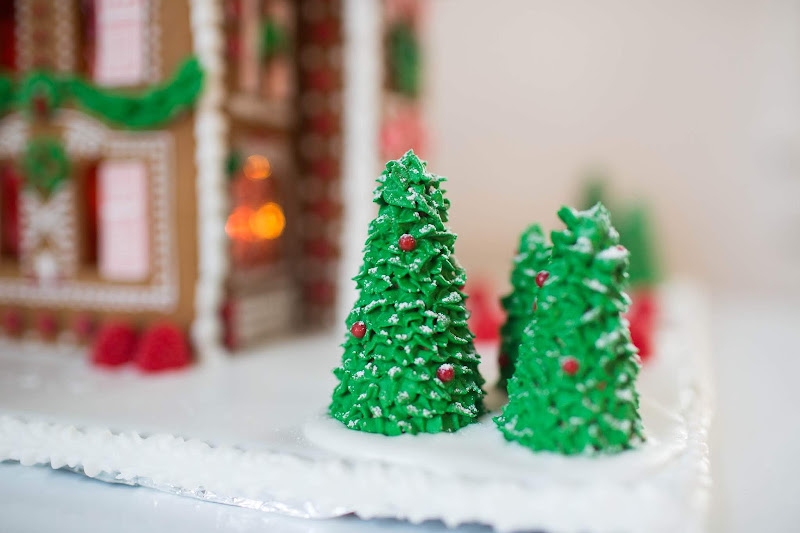
Trees- Mini ice cream cones piped with green royal icing using a tip topped with powdered sugar once it's dry
I used red M&M's for decorating and leftover holly berries & leaves from a previous year of buying a gingerbread kit.

gingerbread, gingerbread house decorating, christmas gingerbread house, gingerbread recipe, christmas house, gingerbread house recipe,
I did all of the detailed piping before I assembled and left the heavy candy for once the house was built.

Pumpkin Bundt Cake

10.29.2018


Blueberry Pancakes

9.13.2017

With all the blueberries we picked, I made blueberry pancakes most mornings for when Landon would get off of night shift.  They are soooo yummy and writing this makes me want some for dinner tonight!
I like to use this recipe but I add in a dash of vanilla as well as separate the egg yolk from the whites and whisk the whites until it's stiff and then fold that in at the end in the batter to make them extra light and fluffy.


Strawberry Crumble Muffins

6.28.2017

After picking so many strawberries I now have a list of recipes I want to make... only thing is my little strawberry monster has eaten pretty much all of them! So here's what we made this morning, and we will see if we have any left for a yummy frozen strawberry dessert I have in mind!

Strawberry Crumble Muffins
Muffin:
1/4 c. unsalted butter, softened
3/4 c. sugar
1 egg
1 tsp. vanilla
1 1/2 c. flour
2 tsp. baking powder
1/2 tsp. salt
1/2 c. milk
*1/2 c. strawberry jam, optional

Topping:
1/2 c. flour
1/4 c. brown sugar
1/4 c. sugar
1/4 c. unsalted butter

Directions:
1. Heat oven to 350 degrees F. Line 12 standard-size muffin cups with paper baking liners. 

2. In a bowl, beat butter and sugar until smooth and light and fluffy.  Add egg and vanilla and combine together. 

3. In a separate bowl, whisk flour, baking powder, and salt to combine.  Alternately add the dry ingredients and milk to the wet ingredients, stirring after each addition until combined. Don't over mix to prevent the muffins from being tough.

4. Divide batter evenly among muffin cups, about 2-3 tbsp. per cup.  

*5. Add a spoonful of jam to the top of the batter and take a toothpick to marble it into the batter.  This is optional.  The original recipe didn't call for it and I didn't do it in the muffins I photographed but I felt like they could use a little something so for my next batch I will do this!

6. Top the marbled batter with chopped strawberries, push a few in the batter.

7. To make the topping, in a small bowl combine all ingredients with the melted unsalted butter, leave pea-sized crumbles, and sprinkle on top of muffins. 

8. Bake muffins 18 to 20 minutes until golden.  Enjoy with butter and a drizzle of honey! 

Flatbread 3 Ways

6.19.2017


For my June post for Say Yes I made these flatbread pizzas.  I used store bought naan bread and made a creative, classic and dessert option. 
Grilled peaches with mixed greens and balsamic glaze
Classic margherita style
Cinnamon streusel with strawberries and sugar glaze

German Chocolate Cake

6.17.2017

The entire week before Mother's Day, Landon was working 8 days straight and would barely have enough time to eat dinner and shower and then he was sleeping, so I wasn't expecting anything because he literally had no time.  So I figured if it was Mother's Day, I was going to eat some dang good food.  I made Cafe Rio for dinner and finished it off with this German chocolate cake.  It's my favorite kind of cake and I've been wanting it for my birthday for the last 3+ years but always settle for something else, so I figured just to go for it.  It was delicious and hit the spot.

The Very Hungry Caterpillar

Notice the baby belly :)
During this time of the year Rhode Island has TONS of caterpillars everywhere.  When I moved here last year I was amazed and excited for tons of butterflies to be everywhere in the next couples weeks... well little did I know they are gypsy moths and little annoying brown moths that cover everything.
So with us seeing caterpillars everywhere I thought it would be fun to make some edible ones with fruits and veggies.  Juniper loved playing with them until she realized how tasty the peanut butter and eye balls were... all fruits and veggies were left to the side of course but it was still fun nonetheless.


Banana Streusel Chocolate Chip Muffins

6.16.2017


As Juniper gets older I love to incorporate her in the kitchen as much as I can.  It's usually more stressful and sometimes frustrating but nothing can beat seeing the excitement in her eyes. And when Landon has crazy hours (which has been more frequent lately) I like to have things he can easily grab and eat in the car when he leaves in the early mornings or a quick snack for when he gets home in the early morning, and these banana muffins are perfect for that. They are super light and fluffy. I prefer no chocolate chips because it takes away from the banana flavor but with Landon's request you will most always find chocolate in them. 

Banana Streusel Chocolate Chip Muffins
adapted from here

Streusel Topping
1/2 cup unbleached all-purpose flour
1/4 cup brown sugar
1 tsp. cinnamon
4 tbsp. butter, melted

Muffins
1 1/2 cups unbleached all-purpose flour
1 tsp. baking soda
1 tsp. baking powder
1/2 tsp. salt
3 large, ripe banana, mashed
3/4 cup sugar
1 egg, slightly beaten
1/3 cup butter, melted
3/4 cup semi-sweet chocolate chips, plus 2 tsp. of flour

Directions
1. For the topping, in a medium bowl, mix flour, brown sugar and cinnamon. Add melted butter and mix until crumbly. Leave crumbs the size of peas. Put aside while preparing muffin batter
2. For the muffins, preheat oven to 375 degrees. In a large bowl, combine dry ingredients. Set aside.
3. In another bowl, combine mashed bananas, sugar, slightly beaten egg and melted butter. Mix well. Stir into dry ingredients just until moistened.
4. If you plan on using chocolate chips, put 3/4 cup of chips into a small bowl. Add in 2 tsp. of flour and coat the chocolate chips in the flour, this prevents them from all sinking to the bottom of the muffin. Add to the muffin batter and fold in.
5. Fill greased muffin cups two-thirds full. (Do not use paper muffin cups). Using hands, arrange coarse, pea-sized crumbs over muffin batter.
6. Bake at 375 degrees for 18-20 minutes or until muffins are done. Cool in pan 10 minutes before transferring to a wire rack.


Baking with Juni

5.12.2017

One of the things I'm so excited about as Juniper gets older is baking and doing crafts with her.  She has always shown interest in the kitchen and always wants to be involved; this time we baked bread! I don't think she gets the full concept of it all but when we put the dough in the cast iron pot and then opened the lid an hour later to find this loaf she was in complete awe. With her wide eyes and jaw dropped she was in shock that we made that.  Once it cooled I let her hold it and she was so proud and excited that I let her hold it all by herself (you can see it in her face), it was seriously the cutest experience with her.  And when I set it down to get that one "hero shot" she came behind me to the coffee table and pulled out her plastic knife and said "mama cut" "mama eat".  We of course had a piece with butter and honey and we both really enjoyed it, there's nothing like

Crusty No-Knead Bread
recipe from Just A Pinch
makes 1 loaf
3 cups of bread flour (all-purpose can work well too)
1 tsp. salt
1 tsp. active dry yeast
1 1/2 cups of lukewarm water
Dutch oven (I used 5.5 qt) or oven-safe large bowl with a lid

Directions:
1. In a large bowl whisk together the dry ingredients. If you’re adding any additional ingredients add them in with the flour before adding any liquid. Add the warm water and mix together with a wooden spoon until it forms a shaggy dough. Don’t overwork the dough and don’t worry about it looking pretty!
2. Cover the bowl with a lid, plastic wrap, or towel and place in a warm non-drafted area.  Let it sit at room temperature for 12-24 hours, don’t disturb it and let it do its magic!
3. After the dough is bubbly and at least doubled in size preheat the over to 450ºF. Place your Dutch oven uncovered into the oven and let it preheat for 30 minutes.
4. While your Dutch oven heats remove your dough from the bowl and turn onto a well-floured surface.  With floured hands work dough into a ball and let it sit for 30 minutes covered with plastic wrap.
5. Carefully remove the Dutch oven and place the dough in the middle and place lid on top and put it back into the oven and bake for 25 minutes. Carefully the remove the lid and let the bread continue to bake for 10 minutes to get golden brown.


Acai Bowls

Every morning in the beginning of my pregnancy (before I got morning sickness) Juniper and I would share a green smoothie and that was my way of getting some greens in her (and me).  Well now I'm craving sweets and sugar like CONSTANTLY with this baby #2! It's bad! With Juniper I wanted fruit but nothing super sweet, but with this pregnancy I just want everything chocolatey, sweet and everything yummy.  So my way of not being overly indulgent is making these acai bowls when I want something sweet.  Juni calls it ice cream and it really does taste like it with all these yummy toppings! 
I know they are really popular right now so probably most people know how to make them but just in case you don't here's a little down low on how I make them. 

Acai Bowls

• Acai Smoothie:
1 Trader Joes unsweetened acai pack (link here)
1/2 frozen banana
4 frozen strawberries 
and some cold water to allow it to mix if you have a crappy blender like me
(You can use almond milk or coconut milk or really whatever but right now I haven't been drinking that so I just use water)

• Toppings:
my must haves are:
banana
granola
drizzle of honey
chia seeds
flax seeds

more options:
cocoa nibs (which I tried for the first time and it made it more like a yummy dessert)
strawberries
frozen berries 

YUM!


Pomelo © All rights reserved · Theme by Blog Milk · Blogger